How to measure for crown molding
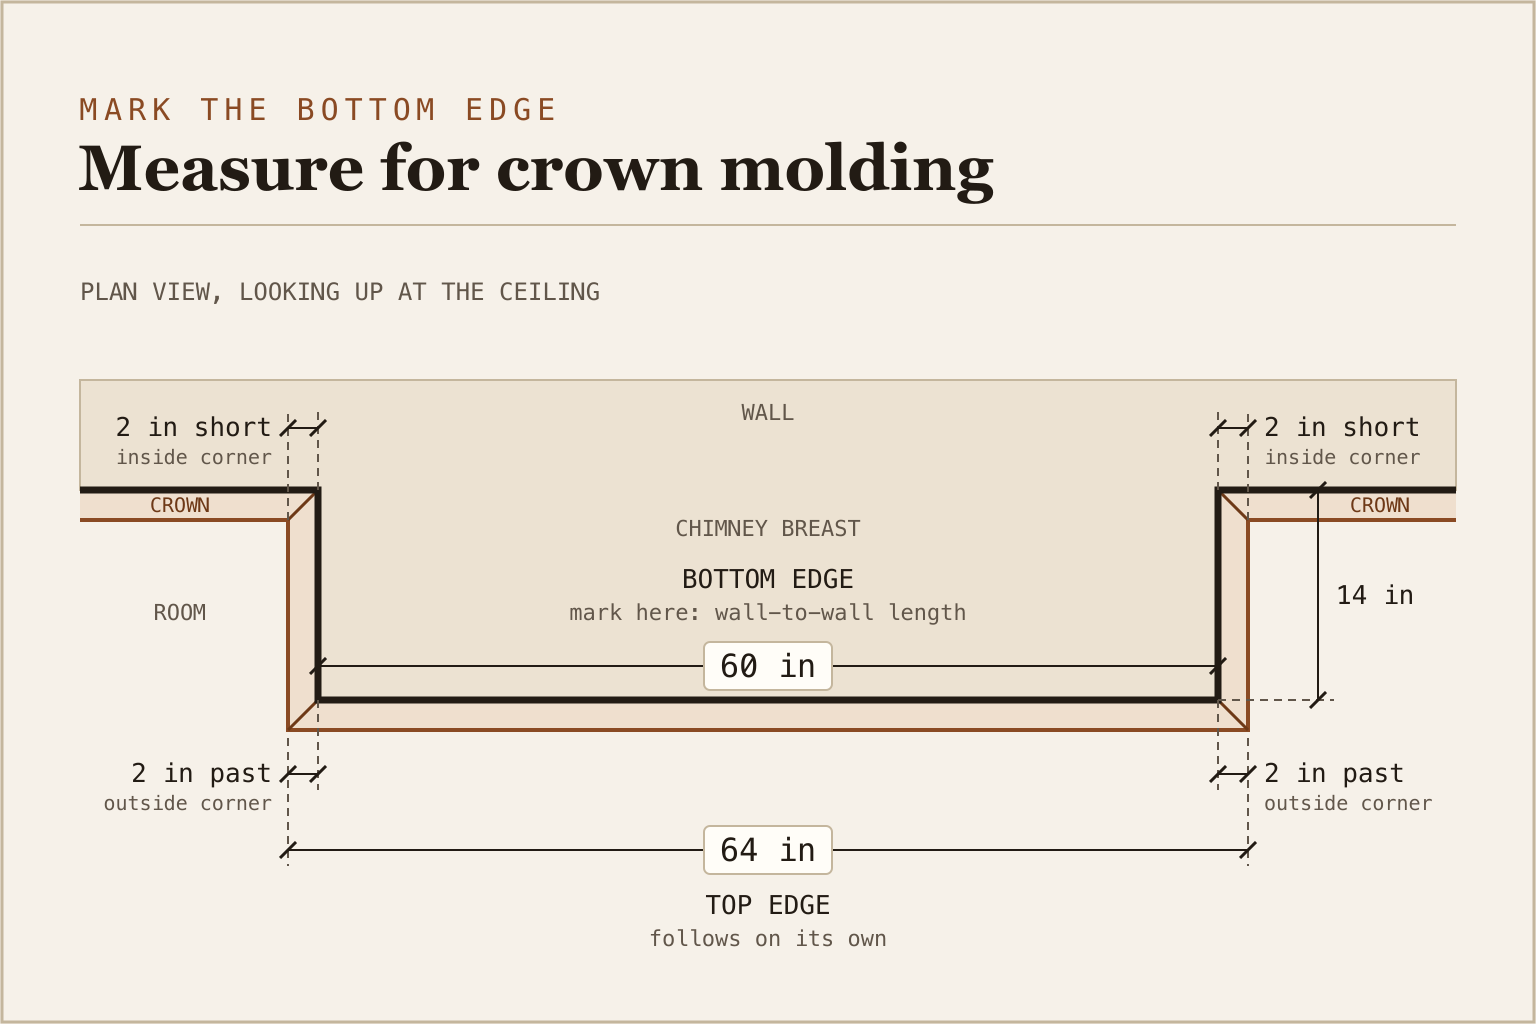
To measure for crown molding, tape each wall corner to corner at the height where the crown's bottom edge will sit, then mark that length on the bottom edge of the molding. That one rule works on every corner. On an inside corner the mark is the long point of the miter. On an outside corner it's the short point, and the top edge runs past the corner by the crown's projection, about 2 inches on a common 3-5/8 inch profile. For the shopping list, This Old House has you measure each wall and round up to the nearest foot. A trim carpenter on WoodWeb adds 10 percent on top of that, and Bob Vila's trim guide says 20. Buy by the wall, though, not by the total.
How much crown molding do I need?
Add up the walls, each rounded up to the nearest foot, and expect to buy 10 to 20 percent more than that. Then check the total against real stick lengths. Crown comes in 8, 12 and 16 foot pieces, and each wall wants one piece long enough to cover it with some left over for a recut.
Home Depot lists the common WM 49 profile, 9/16 by 3-5/8 inch, at 96, 144 and 192 inches. Bob Vila's guide only mentions 8 and 12 foot lengths at home centers, so call ahead if you want 16s. And plan the ride home. A 16 foot stick doesn't fit in a hatchback.
Here's why the total alone misleads. Take a bedroom that measures 11 ft 10 in by 14 ft 9 in at the ceiling. Rounded up, that's two 12 foot walls and two 15s, or 54 feet. Add 10 percent and you get about 59 feet, which sounds like five 12 foot sticks. But a 12 foot stick can't cover a 14 ft 9 in wall, so both long walls need a splice and a 33 inch filler. That's two scarf joints you didn't need.
Plan it by wall instead. Four 16 foot sticks make 64 feet, 10 more than the rounded total, and nothing gets spliced. The long walls get 15 inches of spare each and the short walls get 50. It's the same logic as the WoodWeb carpenter, who cuts each 12 foot wall out of a 16 foot piece.
That spare length is the real waste allowance. A botched corner costs whatever you cut off to try again, and on 3-5/8 inch crown that's about 2 inches a try, roughly the crown's projection. You could save 8 feet by buying 12s for the short walls. A 12 foot stick on an 11 ft 10 in wall leaves 2 inches, which is one try. Miss the cope and you're back at the store.
So give the most spare to the hardest piece. In the room order from how to install crown molding, the last wall gets a cope at both ends. In this bedroom that's a short wall cut from a 16, with 50 inches to work with.
Where do you measure the wall?
Measure at the ceiling, on the line where the crown's bottom edge will land, from corner to corner. Not at the floor. Walls lean and corners fill up with joint compound, so the floor number can differ from the one the crown sees. Mark that line first with a scrap of the real crown.
Getting a tape into two inside corners at once is awkward, so take two pulls. Push the hook into the left corner, run the tape past the middle of the wall, and make a pencil tick at an even number, say 90 inches. Then measure from the right corner to the same tick and add the two. A laser measure does it in one shot.
Read to the sixteenth and convert to inches on paper, not at the saw. 14 ft 9 in is 177 inches.
Don't subtract doors and windows. Bob Vila's guide says to take out door and closet openings, which is right for baseboard. Crown runs over the top of every door head. The only things that break a crown run are cabinets, soffits or built-ins that go all the way up to the ceiling.
Measure along the wall, mark the bottom edge
This is the rule that makes every corner simple. The bottom edge of crown, the one that touches the wall, always ends at the corner of the wall it's on. So the wall-to-wall number you measured is always the length of the bottom edge.
JLC's article on production crown says the same thing from the saw's side: the long point of an inside miter sits on the wall edge, and so does the short point of an outside miter.
Source: JLC, Installing Crown Molding: Production Techniques.The top edge is the one that moves. It sits out on the ceiling, one projection away from the wall, so it can't end at the corner. At an inside corner it stops short by the projection. At an outside corner it runs past by the projection. You never measure it. It falls into place once the bottom edge is right and the saw has the right miter and bevel.
Take a chimney breast 60 inches wide, trimmed with crown that projects 2 inches. The bottom edge of the face piece is 60 inches, corner to corner. The top edge comes out 64, because it wraps 2 inches past each outside corner. Put the 60 on the top edge by mistake and the piece comes up 4 inches short.
On the saw, cut flat the way the guides here do it (face up, top edge against the fence), and the bottom edge is the one facing you at the front of the table. Cut one end, measure from that end's point on the bottom edge, and mark the length on the front edge. If you cut nested instead, the bottom edge rides up against the fence, so the mark goes there.
Inside corners and coped ends
Every inside-corner piece is measured wall to wall, whether its ends get a square cut, a miter or a cope. What changes is how long you cut it.
A square end butts into the corner and gets cut right to the number. It can even be a hair short, because the cope that rides over it hides that. THISisCarpentry says a square piece cut 1/16 inch short is still covered everywhere but the bottom edge.
A coped end goes long. Cut the miter that sets up the cope with its long point at your measurement plus 1/16 inch, so the piece snaps in tight. Tucker Windover, writing in Fine Homebuilding, goes to 1/8 inch on anything over 8 feet and bows the piece in. Keep short pieces at 1/16. They have no length to bow, and a piece that's too long won't seat.
Outside corners and short returns
For an outside corner, measure along the wall to the corner and mark the bottom edge at that length. That mark is the short point. Cut the outside miter there, with the table swung toward the piece, and the top edge runs one projection past the mark on its own.
Check it before the real cut with This Old House's mock-up. Cut two 12 inch scraps at your outside-corner settings, hold them together on the corner, and mark the ceiling where their top edges meet. That mark is where the long point of the real piece has to land. If the scraps won't close without a gap, the corner isn't 90. Outside corners often read 91 or 92 because of the corner bead, and inside vs outside corners covers how to measure them and what that does to the settings.
Short returns, like the 4 inch side of a shallow chimney breast, are hard to tape and risky to cut as a loose block. Cut the miter on the end of a long stick, hold the stick in place, and mark the other end right off the wall. Then cut the short piece free. Your fingers stay a stick's length from the blade.
How do you measure crown molding itself?
Crown is sold by thickness and width, like 9/16 by 3-5/8 inches for a WM 49. Those numbers don't tell you where it lands on the wall. For that you need the drop, how far it comes down the wall, and the projection, how far it reaches across the ceiling. Set a scrap in a framing square the way it hangs and read both legs.
A WoodWeb thread on crown sizing makes the point: a sprung crown's width is measured point to point across the profile, and it is not the wall projection. Bill Shaw uses the framing square method in his Fine Homebuilding coping article and reads 3-1/8 inches of ceiling projection on his example crown.
The two numbers also confirm the spring angle. On 38 degree crown the projection is about 0.78 times the drop, on 45 degree crown the two are equal, and 52 degree crown reaches about 1.28 times as far out as it comes down. Lowe's lists its allen + roth 3-5/8 inch 49 crown at a 38 degree spring with 2.01 inches of projection, which puts the bottom edge about 2-9/16 inches below the ceiling. If your ratio doesn't match any of the three, read crown molding spring angle before you set the saw.
Long walls and splices
A wall longer than your longest stick gets a scarf joint. This Old House centers the scarf over a stud, so find the studs along the layout line first. Then measure from the corner to the center of the stud where you want the seam, and mark it on the bottom edge. That's where the joint goes.
Pick the stud that keeps the seam out of the main view. A scarf facing the door gets looked at every time someone walks in. One on the far side of the room, or behind where a tall bookcase will stand, doesn't. The cut itself, two opposing 45 degree miters glued and pinned, is in the install guide.
Write a cut list before you cut
Sketch the room from above. This Old House numbers the walls counterclockwise and writes each piece's number on its back to match the sketch. Add two things to yours: the bottom-edge length of every piece, and what happens at each end. Here's the bedroom from earlier, with the square-ended piece on the long wall opposite the door:
| Piece | Wall at the line | Ends | Cut the bottom edge to |
|---|---|---|---|
| 1 | 14 ft 9 in | Square, square | 177 in |
| 2 | 11 ft 10 in | Cope, square | 142-1/8 in |
| 3 | 14 ft 9 in | Cope, square | 177-1/8 in |
| 4 | 11 ft 10 in | Cope, cope | 142-1/8 in |
Last, measure every corner with an angle finder and write it on the sketch. A coped corner within a degree or two of square can stay at the square settings, since the cope absorbs it. Outside corners can't. Enter each one with your spring angle into the crown molding angle calculator and download the cut sheet, so the saw settings sit next to the lengths when you cut.
Sources
- This Old House, How to Put In Crown Molding, by Charles Wardell with Tom Silva: measuring each wall and rounding up to the nearest foot, the plan-view sketch, numbering the walls counterclockwise and each piece on its back, the two 12 inch scrap mock-up that marks an outside corner's long point on the ceiling, and centering a scarf over a stud (thisoldhouse.com).
- Tom Scalisi and Bob Vila, 6 Things to Know Before Installing Interior Trim: the 20 percent extra, subtracting openings for trim, and the 8 and 12 foot home-center lengths (bobvila.com).
- WoodWeb, Measuring and Estimating Trim Quantities: the trim carpenter who orders 16 foot pieces plus 10 percent and cuts each 12 foot wall from a 16 (woodweb.com).
- WoodWeb, Stating Dimensions for Crown Moulding: a sprung crown's width is measured point to point, not as the wall projection (woodweb.com).
- JLC, Installing Crown Molding: Production Techniques: the long point of an inside miter and the short point of an outside miter both sit on the wall edge (jlconline.com).
- Home Depot product listings for Woodgrain Millwork and CMPC WM 49 crown, 9/16 by 3-5/8 inch: the 96, 144 and 192 inch lengths (homedepot.com).
- Lowe's, allen + roth 3-5/8 inch 49 crown moulding: the 38 degree spring and 2.01 inch projection (lowes.com).
- Bill Shaw, The Secret to Coping Crown Molding, Fine Homebuilding issue 194: reading the projection with a framing square, and the 3-1/8 inch example (finehomebuilding.com).
- Tucker Windover, Inside Crown Corners, Fine Homebuilding issue 209: cutting pieces over 8 feet 1/8 inch long.
- THISisCarpentry, Cutting and Coping Crown Molding, 2019: the square piece cut 1/16 inch short (thisiscarpentry.com).
- The drop, the projection past each corner, and the recut length are computed from the listed projection with the same geometry as the CrownMiter calculator.
Frequently asked questions
How much crown molding do I need for a 12 by 12 room?
Plan four sticks, one per wall. If each wall measures 11 ft 10 in or less at the ceiling, 12 foot sticks fit with about 2 inches to spare, which leaves no room for a recut. Buying 16s gives you that room. The trim carpenter in a WoodWeb thread cuts each 12 foot wall from a 16 foot piece and adds 10 percent to the order.
Do you subtract doors and windows when measuring for crown molding?
No. Crown runs along the top of the wall, over every door and window head, so measure the full wall from corner to corner. Subtracting openings is a baseboard rule. The only things that break a crown run are cabinets, soffits or built-ins that go all the way to the ceiling.
Do you measure crown molding on the top or bottom edge?
The bottom edge, the one that sits on the wall. Its ends always land at the wall corners, so the wall-to-wall measurement is its length on every piece. On an inside corner that mark is the long point of the miter. On an outside corner it's the short point. The top edge shifts by the projection.
How long do you cut crown molding for an outside corner?
Mark the wall length to the corner on the bottom edge and cut the outside miter there. The top edge runs one projection past the corner, about 2 inches on 3-5/8 inch crown. Cut the first try a touch long, dry-fit it, and trim, since outside corners often read a degree or two past 90.
Should you cut crown molding a little long?
Coped pieces, yes: 1/16 inch long on short runs and up to 1/8 inch on pieces over 8 feet, so they spring in tight. Square-cut pieces get cut to the number, because the cope covers a hair short. Outside miters get cut slightly long and trimmed after a dry fit.