How to install crown molding
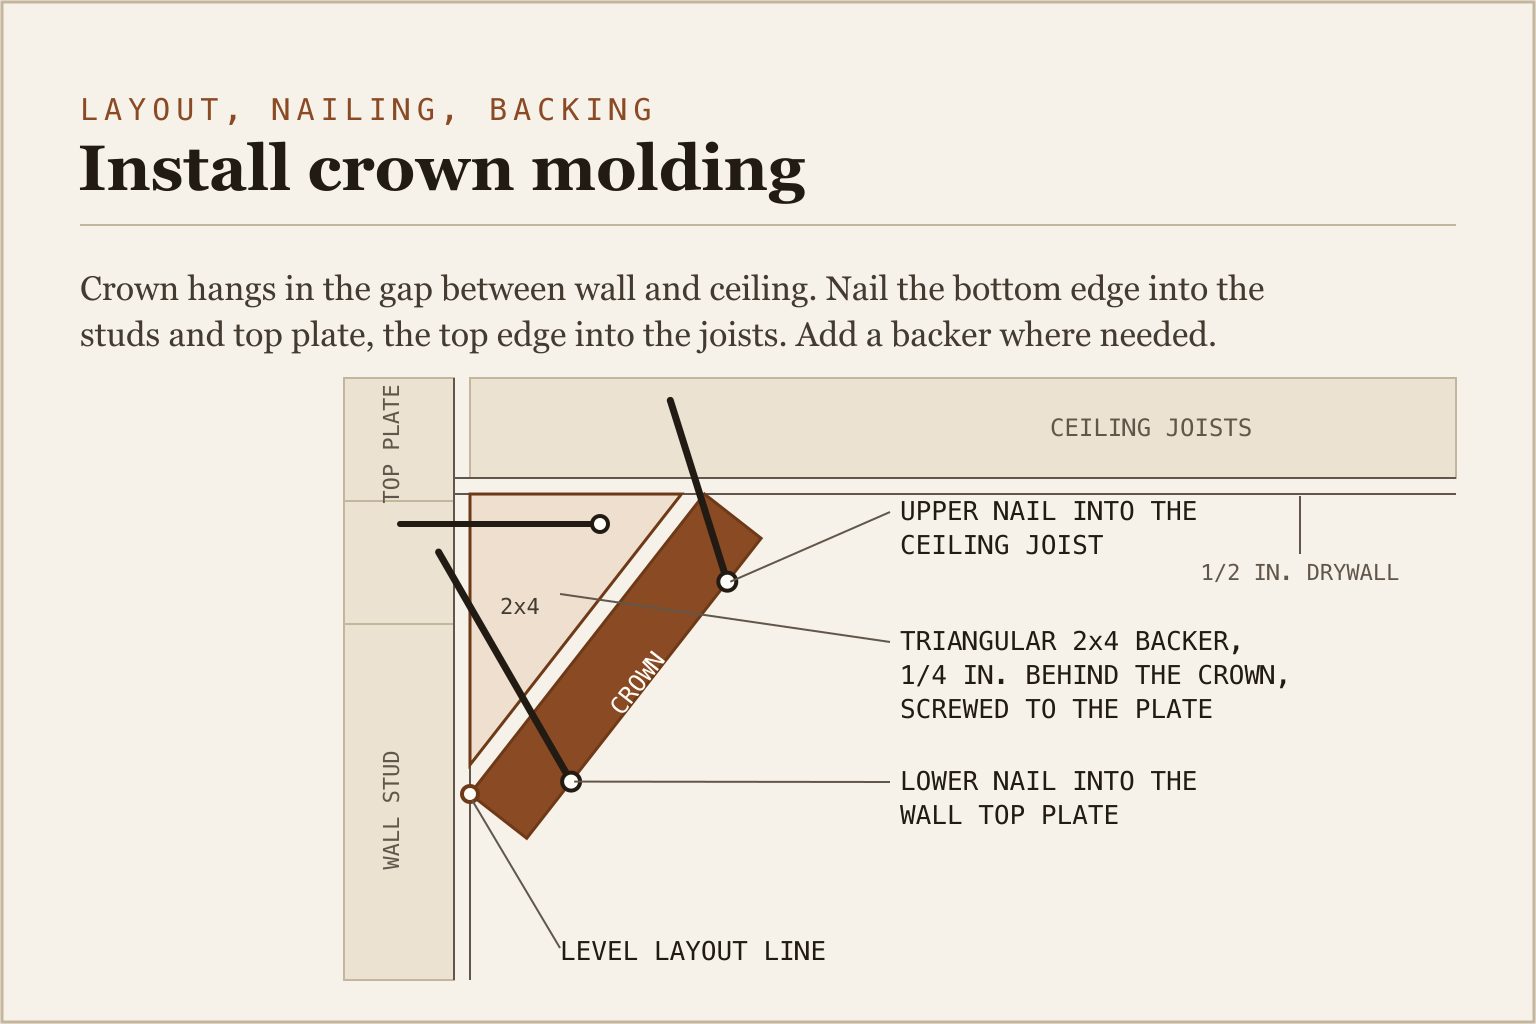
Installing crown molding is four jobs stacked together: size the crown to the ceiling, mark a layout line, cut the corners, and fasten into something solid. The one that sinks people is fastening, because crown hangs in the gap between the wall and the ceiling and there is often no framing directly behind it. The short answer: nail the bottom edge into the wall studs and the top plate with 2 inch, 16 gauge finish nails, nail the top edge up into the ceiling joists where they run the right way, and where nothing lands, screw a triangular backer to the top plate first. Here is the whole job, from the lumber rack to the caulk gun.
What size crown molding should you buy?
Size the crown to the ceiling height. Horner Millwork's sizing guide puts an 8 foot ceiling at 2-1/2 to 6 inches of crown height, and a 9 foot ceiling at 3 to 7-1/2 inches. Under 3 inches on an 8 foot wall reads as a thin stripe from across the room. Over 6 crowds the space.
Room size counts too. A 10 by 10 bedroom on an 8 foot ceiling wants the small end of that range; a 20 foot living room can carry the top of it.
For quantity, measure the perimeter, add 10 to 15 percent for waste, and round up to whole sticks. Crown sells in 8 and 12 foot lengths at most yards, sometimes 16. The waste is not padding: every corner eats a few inches into the miter, and your first two practice cuts are gone before a single piece goes up.
Then stack it flat in the room it is going in and leave it there before you cut. Elite Trimworks tells customers to acclimatize trim inside for at least 24 hours, and notes that every 16 feet of moulding shrinks about 1/16 inch. Small number, until it opens as a black line across a joint six weeks after you painted. Solid pine moves with humidity more than MDF, so give pine longer.
Mark the layout before you cut anything
Hold a scrap of the real crown in a corner the way it will hang and mark where its bottom edge lands on the wall. The profile sets that height, not you. Transfer it around the room with a level or a laser, then mark the ceiling where the top edge will touch, which is the method This Old House uses.
Here is the catch: the line is your reference, not your rule. Ceilings wave. A gap along the top edge sits at eye level and shows, so the top edge follows the ceiling and the bottom edge drifts a little off the line. Nobody looks at the bottom edge.
While the stud finder is out, mark every stud and joist above the line, on painter's tape so the marks survive.
What do you nail crown molding into?
The bottom edge goes into the wall studs and the double top plate behind the drywall. The top edge goes up into the ceiling joists, but only where they run perpendicular to that wall. Studs sit 16 inches on center in most 2x4 walls and 24 inches in 2x6 walls, and ceiling joists run 12, 16, or 24 inches apart.
Two inch, 16 gauge finish nails cover the normal case. With 1/2 inch molding over 1/2 inch drywall, a 2 inch nail still buries about an inch in framing, and a 16 gauge hole disappears under putty. Plaster ceilings are thicker than drywall, so those need 3 to 3-1/2 inch nails to reach anything. At the corners, use a 1 inch brad plus glue instead, since a long nail there splits the miter. Shoot a pair at every stud, one low into the plate and one high into the joist.
Now the awkward runs. On a wall where the joists run parallel, there is nothing above the top plate to grab, so you build something to grab.
Rip a triangular backer out of a 2x4 at the crown's spring angle, size it so it sits about 1/4 inch behind the back of the crown, and screw it to the top plate. This Old House and JLC both put those blocks in at 24 inches on center.
Source: This Old House, crown molding backing strips, and JLC, "Blocking for crown molding" (thisoldhouse.com, jlconline.com).The spring angle is what makes that rip work, and it is the same number your saw settings come from, so read crown molding spring angle if you have not pinned yours down yet.
Work around the room in the right order
The order is not arbitrary. Start on the longest wall opposite the door, then work around the room in one direction.
Wall one gets both ends cut square and butted straight into the corners. Its ends are ugly and that is fine, because the next pieces cope over them. Walls two and three each get one coped end and one square end. Wall four is coped at both ends, the hardest cut in the room, so leave it for last and cut it long on purpose.
Cope the inside corners and miter the outside ones. A coped end rides over the face of the piece it meets and stays tight even when the corner is a degree or two out of square. Outside corners have no profile to cope against. For the saw settings and which side of the blade to keep, see how to cut crown molding corners.
Splice long walls with a scarf joint
A wall longer than your longest stick needs a splice, and a butt joint is the wrong way to make one. Two square ends pressed together open into a dark line as soon as the wood shrinks.
Cut a scarf instead: two opposing 45 degree miters that overlap, so one face laps over the other. Glue the joint, land it on a stud, and drive the nail through the overlap to pin both halves. Sand it flush with 100-grit once the glue dries. A lapped joint that shrinks slides against itself and stays closed.
What if the corners are not 90 degrees?
Most of them are not. Hold a bevel gauge into each corner and read the real number before you cut. A wall that measures 92 degrees where you assumed 90 opens a wedge you can see from the doorway, and no amount of caulk hides it on a long run.
Feed the measured corner and your spring angle into the crown molding angle calculator and cut to the miter and bevel it returns. For bay windows and stair walls, how to cut crown molding for odd corners covers the measuring and marking.
How do you fill gaps in crown molding?
Caulk the long edges and putty the nail holes. This Old House sets the caulk limit at gaps under 1/4 inch: run paintable latex caulk where the crown meets the ceiling and where it meets the wall, then tool it with a wet finger. Fill nail holes with putty, sand at 100-grit, prime before the finish coat.
A gap wider than 1/4 inch is a cut problem, not a caulk problem. Caulk that thick shrinks and cracks, and the mistake shows once the paint goes on. Pull the piece and recut it.
One thing not to caulk: an open miter. Glue and pin it closed instead. Caulk inside a joint holds the two faces apart, so nothing holds the joint together the next time the room dries out.
Sources
- This Old House, "How to install crown molding" plus its guide to crown backing strips: level line for the bottom edge, ceiling mark for the top, opposing 45 degree scarf joints glued and sanded at 100-grit, caulk for gaps under 1/4 inch, triangular 2x4 backers set about 1/4 inch behind the molding. JLC, "Blocking for crown molding," puts those blocks at 24 inches on center (thisoldhouse.com, jlconline.com).
- Horner Millwork crown moulding sizing guide: 2-1/2 to 6 inches of crown height for an 8 foot ceiling, 3 to 7-1/2 inches for a 9 foot ceiling (hornermillwork.com).
- Elite Trimworks FAQ: acclimatize trim inside for at least 24 hours, and every 16 feet of moulding shrinks about 1/16 inch (elitetrimworks.com).
Preguntas frecuentes
What size nails do you use for crown molding?
Two inch, 15 or 16 gauge finish nails handle standard crown over drywall, leaving about an inch of nail in framing. At the corners, switch to a 1 inch brad plus glue so the miter does not split. Thick crown or a plaster ceiling needs 3 to 3-1/2 inch nails.
Do you nail crown molding into the ceiling or the wall?
Both. The bottom edge goes into the wall studs and the top plate, and the top edge into the ceiling joists where they run perpendicular to the wall. Where the joists run parallel, screw a triangular 2x4 backer to the top plate at 24 inches on center and nail into that.
Should you glue crown molding joints or only nail them?
Glue them. Wood glue on a miter or a scarf keeps the faces bonded when the room's humidity swings, and the nail only holds them while the glue sets. Skip the glue and the joint opens later, which is the black line you see on most DIY crown.
Can one person install crown molding?
Yes, with a support. Nail a short scrap to the wall at your layout line under the far end of the piece and rest the molding on it. Then start your nails at the middle and work out, since long pieces bow in the middle.
Do you paint crown molding before or after installing it?
Prime and paint before it goes up, then touch up on the wall. Painting a flat stick on sawhorses beats painting overhead, and you need a pass for the nail holes and caulk lines regardless.