How to cope crown molding inside corners
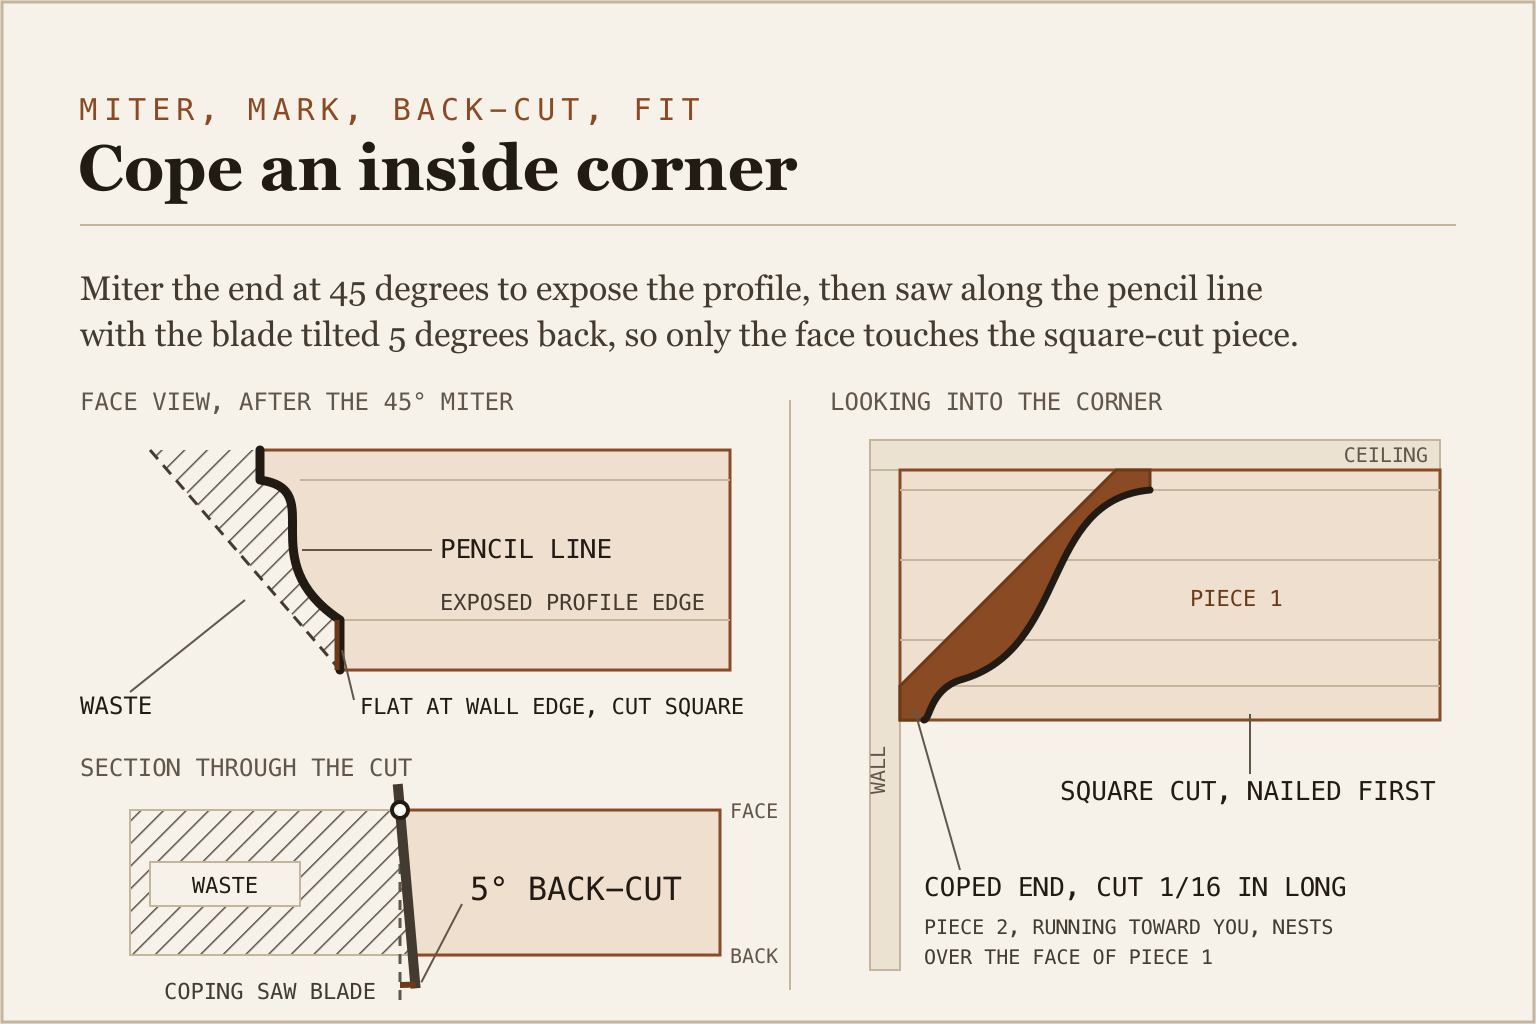
Run the first piece square into the corner and nail it. Cut the end of the second piece with an inside-corner miter so the profile shows on the cut face, darken that front edge with a pencil, and saw away everything behind the line with a coping saw tilted a few degrees back. The shaped end drops over the face of the first piece and the joint closes. THISisCarpentry gives the number that makes the whole thing worth the extra minutes: if the square piece was cut 1/16 inch short, the cope still covers it, all but the bottom edge. A miter shows every sixteenth.
Why cope instead of miter?
A miter only closes on a corner that is a true 90, and it opens again the first dry winter. A cope does neither. Tom Silva at This Old House puts it in one line: a coped joint is less likely than a miter to open up when the moisture changes. THISisCarpentry adds the other half of the case, that a coped piece can be cut a hair long and snapped into place, and the joint closes tighter, not looser.
That is the short version. The long version, with Tucker Windover's wood-movement argument and the list of what production crews still miter, is in inside vs outside corners. This page is about the cut itself.
What you need
A coping saw and a pack of blades. Olson's 6-1/2 inch pin-end blades come in 10, 15, 20, and 32 teeth per inch, and 15 is the one to reach for on crown. Drop to 20 on a fine profile with tight curves. Mount the blade with the teeth pointing at the handle so it cuts on the pull, which keeps the thin blade from buckling.
A pencil, a half-round rasp or a round file, and a sheet of 100-grit. A short scrap of the same crown, 12 inches or so, to test against.
Optional, and worth it after the first room: a jigsaw wearing a Collins Coping Foot. The foot is a domed steel base that replaces the flat one, so you can tilt and pitch the blade while it cuts. Collins recommends a Bosch T244D blade and says the foot fits most pro-grade jigsaws but not fixed-base ones. It runs about $43. Hold the saw upside down by the body, clamp the crown, and cut the waste away from the back.
Step 1: run the first piece square into the corner
The first piece on any wall gets a plain 90 degree cut and pushes straight into the corner. It looks unfinished. That is fine, because the next piece copes over its face and nobody ever sees the end.
Work the room in the order from how to install crown molding: the longest wall opposite the door gets two square ends, the next two walls get one cope each, and the last wall gets a cope at both ends.
Shaw's trick for a wavy ceiling is a 24 inch test piece coped on one end. Hold it in the corner before you nail the square piece, and let the test cope set the height of the square piece where they meet. Then leave the last couple of feet of the square piece unnailed. The cope finds it.
Step 2: cut the miter that exposes the profile
The cope starts as an ordinary inside-corner miter. Its only job is to expose the profile along the face so you have a line to follow. You can make that cut two ways.
Nested is the fast way on a square corner. Stand the crown upside down and backwards on the saw: ceiling edge flat on the table, wall edge against the fence, face toward you. Set the miter to 45 and leave the bevel at 0. DeWalt's crown table says which way to swing: for the piece on the left wall, miter right 45 and keep the right end of the cut; for the piece on the right wall, miter left 45 and keep the left end. The rule underneath is that on the saw the stock runs away from the wall it came from, the table swings toward the stock, and you keep the stock.
Shaw's secret, the one his Fine Homebuilding article is named for, is about how the crown sits for that cut. Measure the crown's ceiling projection with a framing square, 3-1/8 inches in his example, and set a stop on the saw at that width so every piece nests at the same angle. Then check: the length of the miter across the face should equal the projection. If it doesn't, the crown was not seated at its spring angle, and the cope will fit the scrap and gap on the wall.
Flat is the other way, and the only way on a saw without a tall fence. Lay the crown face up with the ceiling edge against the fence and set the compound pair for your profile. For 38 degree spring crown on a square corner that is a 31.6 degree miter and a 33.9 degree bevel. For 45 degree crown it is 35.3 and 30. For 52 degree crown it is 38.2 and 25.8. Swing the table away from the piece and keep the side the piece is on. The orientation is spelled out in how to cut crown molding flat.
A corner that is off by a degree or two still gets the square-corner settings, because a cope forgives that much. Past about 2 degrees, set the nested miter to 90 minus half the corner, so a 92 degree corner gets 44, or feed the corner and the spring angle into the crown molding angle calculator for the flat pair.
Step 3: mark the line and saw the cope
Darken the front edge of the miter with a pencil. That is the line where the cut face meets the finished face, and Tom Silva marks it on every cope because a graphite line is easier to follow than a change in grain.
Andy Engel, writing in Fine Homebuilding, starts with the easy part: cut the flat at the wall edge square across, then pick up the profile line from there. On the curves, let the blade follow the pencil and turn the frame, not the wood.
The back-cut is what makes the joint close. Tilt the blade past square so the saw removes more from the back than from the face and only the pencil line is left touching. Joseph Truini at This Old House holds it about 5 degrees back. Go further on a deep profile. Shaw makes one deep relief cut rather than two shallow ones, so the joint can't rock if the crown cups later.
Coped right, the cut goes as deep as the crown is thick, so 3/4 inch crown gets a 3/4 inch deep cope. That is THISisCarpentry's rule, and it is the quick check that you have taken enough off the back.
Source: THISisCarpentry, Cutting and Coping Crown Molding, 2019.How do you test and fix a cope?
Hold the coped end against a 12 inch scrap of the same crown, both pieces sitting at their spring angle, and look for daylight. Rasp or file the high spots on the back of the cope, never the face, and try again. Silva finishes with 100-grit or a round file where the blade left it rough.
Read the gap before you file. A gap along the top edge means the two pieces are sitting at different heights, so the square piece is off its projection, not the cope. A gap in the middle of a curve means the back-cut is short there. A hairline that closes when you push the piece toward the corner means cut the next one a shade long and bow it in.
Then hang it. Cut the piece about 1/16 inch long, hold the far end off the wall, push the cope home, and nail from the cope outward. Keep the nails 2 feet back from the joint until it fits.
When a cope won't work
Some crown won't cope, and forcing it wastes a stick.
MDF crumbles along the thin edge of a back-cut, so Windover miters it. Beaded profiles go too thin at the bead when you cut behind them, and Top Shelf DIY's fix is to miter both pieces and hand-cope only the deep parts. Profiles with a return that a blade cannot reach get mitered, and so does cabinet crown on boxes you already know are square. Very large crown that will not stand up nested gets cut flat, and coping a 7 inch profile by hand takes patience most jobs don't have.
Outside corners are never coped. There is no profile to nest against, so they get a miter, glue, and pins.
Keep the wood where it will stay
A cope hides seasonal movement better than a miter, but it can't hide a stick that was wet when you cut it.
Shaw's article puts the target at 35 to 40 percent relative humidity and 60 to 70 degrees F, with the crown sitting in the room before the first cut.
Source: Bill Shaw, The Secret to Coping Crown Molding, Fine Homebuilding issue 194.The install guide's rule of a day in the room is the minimum. Pine wants longer than that in a damp basement.
Sources
- Bill Shaw, The Secret to Coping Crown Molding, Fine Homebuilding issue 194: the ceiling-projection stop with the 3-1/8 inch example, the miter length equal to the projection, the 24 inch coped test piece, the single deep relief cut, and the 35 to 40 percent humidity and 60 to 70 degree F shop conditions (finehomebuilding.com).
- THISisCarpentry, Cutting and Coping Crown Molding, 2019: the 45 degree preparatory miter, the cope depth equal to the crown thickness, the 1/16 inch short square piece, and cutting long and snapping in (thisiscarpentry.com).
- Andy Engel, Coping Crown Molding on Inside Corners, Fine Homebuilding: nesting the crown upside down and cutting the bottom corner square first (finehomebuilding.com).
- This Old House, How to Cope a Joint for Crown Molding with Tom Silva: the pencil line, the 100-grit and round file, and the moisture line, plus Joseph Truini's 5 degree back-cut (thisoldhouse.com).
- Tucker Windover, Inside Crown Corners, Fine Homebuilding issue 209: the 2 foot no-nail zone and mitering MDF.
- DeWalt, How to Cut Crown Molding: the nested and flat cutting tables (dewalt.ca).
- Collins Tool Company, Universal Coping Foot: the fit, the Bosch T244D blade, and the price (collinstool.com).
- Olson Saw coping blade specifications: the 6-1/2 inch blade lengths and tooth counts (olsonsaw.net).
- Top Shelf DIY, Coped Crown: Five Mistakes You Might Be Making: beaded profiles and the 90 minus half rule on out-of-square corners (topshelfdiy.com).
Haeufig gestellte Fragen
What angle do you cut crown molding to cope it?
Nested upside down against the fence, 45 degrees on a square corner with the bevel at 0. Flat on the table with the ceiling edge on the fence, 31.6 miter and 33.9 bevel for 38 degree crown, 35.3 and 30 for 45 degree crown. The miter only exposes the profile. The coping saw does the fitting.
Do you cope both ends of a piece of crown?
Only on the last wall. Work around the room in one direction: the first wall gets two square ends, the next two walls get one square end and one cope, and the closing wall gets a cope at each end. Cut that last piece a hair long and spring it in.
Can you cope crown molding with a jigsaw?
Yes, with a coping foot. The Collins Coping Foot swaps the flat base for a domed one so you can tilt the blade through the cut. Collins recommends a Bosch T244D blade. Clamp the crown, hold the saw upside down by the body, and cut the waste from the back, then clean up with a file.
Why is there a gap at the top of my coped corner?
The two pieces are sitting at different heights. A cope that fits a scrap on the bench and gaps at the ceiling on the wall means the square piece is not at the crown's ceiling projection. Pull its last two feet of nails, reset it to the coped test piece, and refit.
Can you cope MDF crown molding?
Usually no. The thin edge left by the back-cut crumbles, which is why Tucker Windover miters MDF inside corners instead, and a mitered MDF joint wants glue. If you want the forgiveness of a cope on paint-grade work, use finger-jointed pine or poplar instead.